Until now I’ve accessed the internet at home using an old Samsung Galaxy tablet as a mobile internet access point. The tablet was a rather oversized phone than a full working computer, but hey, it got WiFi access and a SIM card slot, so it was perfect into turning into an internet hotspot for zero additional cost. It served it’s purpose well, without causing any particular problems.
Unfortunately its bottleneck was speed. The tablet could only handle HSDPA connections, without any hardware support for LTE. The speed was around 0.5-0.8 MB/s. I don’t need a high speed internet connection, so for browsing the web, watching YouTube or listening to Spotify it was enough. And still having my childhood memories of the internet modem screeching the speed of 0.8 MB/s was more than enough.
Speed started to be an issue when another computer was connected into the network. Also when comparing to sharing the connection through my smartphone with LTE support the tablet was no competition. So my SIM card was LTE ready and thus an idea of buying a LTE router came to my mind. I could have bought one cheaply, but then I also had an idea why not to buy a LTE USB modem instead, plug it into a small computer acting as an access point and have a small home server for free.
Dramatis personae
The Pi
So I ended up buying a used Raspberry Pi 3 that had WiFi support. Note, there’s been a kind of hype on these computers with people buying them for projects that they never finish or even start. It is much cheaper to buy a used kit sold by someone who hadn’t had the heart to continue with this hobby than a completely new one + accessories.
LTE modem
I also bought a cheap Huawei H3372h USB modem. After reading on the internet it turn out that there were two versions of the device, one acting as a stick (H3372s) and other acting as a router (version ending with an h). The stick version allowed to access the device as a typical modem through the serial port. After some reading it turned out that this mode lowered the maximum speed when in the LTE mode. In the other mode the device was recognised as an Ethernet card. I already got the h version, but it is possible to flash it with an older software returning to the modem mode. It was unnecessary in my opinion and staying with the Ethernet mode seemed simpler.
Accessories
Also after doing some research I decided for a 16 GB uSD card. I was blissfully unaware that SD cards come in different minimum speeds defined by classes. The recommended speed for a Pi was a class 10 minimum. I decided to go with a GOODRAM 16 GB class 10 UHS. The price was OK and it fared well in available tests.
I was glad to find a working kit with a 3A power adaptor, which was above the 2A recommended minimum for a Pi to work stably. Also the Raspberry came with w see-through casing which was also cool.
And now the fun part begins…
Installing Raspbian
I installed the newest Raspbian Strech Lite version from the official Raspberry website. I stayed with the Lite version because I did not plan to use it as more than an access point. Moreover it is less resource consuming and I thinks that is important with such a simple hardware.
I followed the official installation guide using Etcher to write to my SD card. The whole process went smoothly and without any inconvinience. I was positively surprised how fast it went.
The process created two partitions: one with a Linux filesystem that is inaccessible from Windows1 and a second one with FAT filesystem. Using the second one it’s possible to configure the Pi without accessing it beforehand. Firstly I created an empty ssh file in the main directory to enable SSH login through the internet. Secondly I enabled WiFi and used my phone as a temporary router.
To configure WiFi I created a wpa_supplicant.conf file as suggested here. The file needs a country code and a network:
update_config=1
country=PL

network={
    ssid="Phone"
    psk="***password***"
    key_mgmt=WPA-PSK
}
I was able to ssh with the default user pi and password raspberry to the IP address given by my phone. I discovered the address using nmap -sn 192.168.100.0/24 to scan the phone’s network.
After that I created an additional user by sudo adduser _username_ sudo. The last option adds the user to sudo users automatically. I also removed the default pi user by issuing sudo deluser -remove-home pi from the new user’s account.
I also used the sudo raspi-config utility to change the domain name, add timezone information and add Polish localisation.
After that I updated the software by sudo apt-get update and sudo apt-get upgrade. I also installed vim and mc for convenience.
I also added some custom tweaks. First one was to disable the LED lights, because they would be annoying at night. To do that I edited the /etc/rc.local file to be the following:
#!/bin/sh -e
#
# rc.local
#
# This script is executed at the end of each multiuser runlevel.
# Make sure that the script will "exit 0" on success or any other
# value on error.
#
# In order to enable or disable this script just change the execution
# bits.
#
# By default this script does nothing.

# Print the IP address
_IP=$(hostname -I) || true
if [ "$_IP" ]; then
  printf "My IP address is %s\n" "$_IP"
fi

bash -c "echo 0 > /sys/class/leds/led0/brightness"
bash -c "echo 0 > /sys/class/leds/led1/brightness"

exit 0
Creating WiFi Access Point
Surprisingly the Huawei LTE modem worked out of the box being recognised as eth1 device at boot and assigned an IP address. The only issue I had is that I had to use the device under Windows first and then access the control panel at http://192.168.8.1 to input my SIM card’s PIN number. Thankfully the device saves the PIN so I don’t have to provide it every time after power on.
eth1: flags=4163<UP,BROADCAST,RUNNING,MULTICAST>  mtu 1500
        inet 192.168.8.100  netmask 255.255.255.0  broadcast 192.168.8.255
        inet6 fe80::7897:7ad8:ad86:1e7  prefixlen 64  scopeid 0x20<link>
        ether 0c:5b:8f:27:9a:64  txqueuelen 1000  (Ethernet)
        RX packets 339944  bytes 398230238 (379.7 MiB)
        RX errors 0  dropped 0  overruns 0  frame 0
        TX packets 115934  bytes 9607793 (9.1 MiB)
        TX errors 0  dropped 0 overruns 0  carrier 0  collisions 0
The device quickly connected to the LTE signal and I could access the internet easily.
user@pi:~ $ ping google.com
PING google.com (216.58.205.238) 56(84) bytes of data.
64 bytes from fra15s24-in-f238.1e100.net (216.58.205.238): icmp_seq=1 ttl=51 time=67.7 ms
64 bytes from fra15s24-in-f238.1e100.net (216.58.205.238): icmp_seq=2 ttl=51 time=66.1 ms
64 bytes from fra15s24-in-f238.1e100.net (216.58.205.238): icmp_seq=3 ttl=51 time=65.2 ms
64 bytes from fra15s24-in-f238.1e100.net (216.58.205.238): icmp_seq=4 ttl=51 time=68.6 ms
^C
--- google.com ping statistics ---
4 packets transmitted, 4 received, 0% packet loss, time 3004ms
rtt min/avg/max/mdev = 65.287/66.949/68.652/1.320 ms
Sharing the connection
Now just to share the connection. I firstly followed the official guide from here. Generally it’s a bridging configuration in which the internet connection is shared in a way that the computers connecting to the Pi are part of the LTE modem’s network. This in consequence disables access to the Pi itself. Maybe there is a way to work around this, but I was in a bit of a hurry to have a working internet connection at home. In the end I had to disable the access point by mounting the Pi SD card under Linux and manually editing the /etc files.
I’ve found a quite working configuration here. Although still I had to make some changes.
I installed hostapd and dnsmasq. I left the /etc/network/interfaces untouched and decided to change only /etc/dhcpcd.conf by adding the following to the end of file. I just attached a static IP to my WiFi card.
interface wlan0
static ip_address=192.168.10.1/24
static domain_name_servers=192.168.10.1
Configuring hostapd
I also configured my /etc/hostapd/hostapd.conf differently. I was able to find an interesting discussion on configuring hostapd here. It also pointed to detailed configuration instructions for hostapd. I found this configuration to have the greatest speed and stability.
interface=wlan0
country_code=PL
# bridge=br0 # Here I
driver=nl80211
ssid=**** # SSID goes here
hw_mode=g
channel=13
macaddr_acl=0
auth_algs=3
ignore_broadcast_ssid=0
# Timing Parameter
beacon_int=100
dtim_period=2
max_num_sta=32
rts_threshold=2347
fragm_threshold=2346
wpa=2
wpa_passphrase=**** # Password goes here
wpa_key_mgmt=WPA-PSK
wpa_pairwise=CCMP
rsn_pairwise=CCMP
ieee80211n=1          # 802.11n support
wmm_enabled=1         # QoS support
ht_capab=[HT40][SHORT-GI-20][DSSS_CCK-40]
Also I had to change #DAEMON_CONF="" line in /etc/default/hostapd to DAEMON_CONF="/etc/hostapd/hostapd.conf".
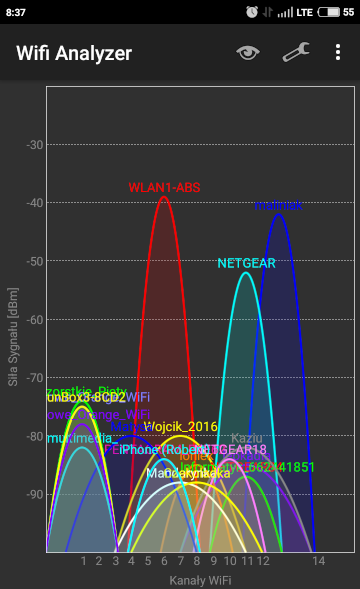
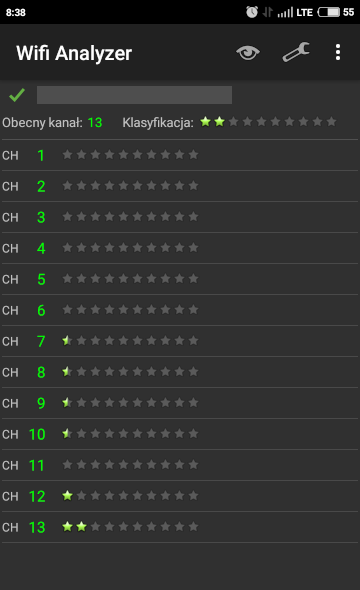
I used Wifi Analyzer on my phone to scan which channel would be optimal for my configuration. It turns out that my neighbourhood is quite noisy and very much populated with other WiFi devices. The best channel seemed to be no. 13. Nice application by the way.


Configuring dnsmasq
Lastly I had to change my /etc/dnsmasq.conf file to enable wlan0 to assign IP addresses.
interface=wlan0
dhcp-range=192.168.10.2,192.168.10.30,255.255.255.0,24h
Firewall settings
Lastly I had to enable routing and port forwarding. I changed the line to be net.ipv4.ip_forward=1 in /etc/sysctl.conf.
Somehow the default firewall configuration described here did not work. I ended up being able to connect to my PI by SSH, but still unable to access the internet outside.
I modified my firewall configuration the following way:
#!/bin/bash

iptables -F
iptables -X
iptables -t nat -X
iptables -t nat -F

iptables -P INPUT ACCEPT
iptables -P FORWARD ACCEPT
iptables -P OUTPUT ACCEPT
iptables -A INPUT -i lo -j ACCEPT
iptables -A FORWARD -o lo -j ACCEPT

iptables -t nat -A POSTROUTING -s 192.168.8.0/24 -j MASQUERADE
iptables -t nat -A POSTROUTING -s 192.168.10.0/24 -j MASQUERADE

iptables-save > /etc/iptables/rules.v4
I also configured a simple SAMBA service to use the Pi as a network storage device.
Summary
The connection speed now reaches up to 20 Mbps. Which is a nice improvement, but not much really. The Pi itself is still a nice and fun device. The overall conclusion is that it would probably be cheaper to invest in a specialized hardware or simply a WiFi router. The Pi itself is just not strong enough to serve as a router. The WiFi is generally week. Also the device uses SD card for storage which makes it unusable as a network storage device to keep larger files. It’s niece for sharing of smaller resources, but otherwise I would not recommend it. Also the connection quality to the Huawei LTE modem is not satisfying. In the modem configuration panel I see only 2/5 bars.
Still I’ve learned a lot about networking in this exercise. And the Pi has been up and running for weeks now without any problems or stability issues.
Update: 27/07/18: It turns out that I only needed to place the device in some other place in my appartment and the LTE signal quality greatly improved. Now I get 40 Mb/s connection speed which is a reasonable improvement compared to previous speed. So in the end the whole endeavour was totaly worth it.
-
It is possible to access the Linux partition from a Linux system. This feature can be useful to access configuration files after ‘bricking’ the Pi with faulty internet access settings. ↩︎